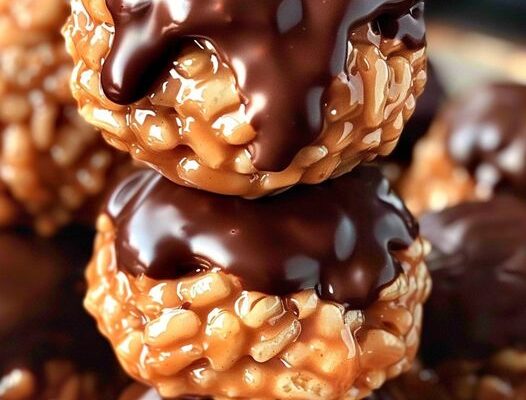
Peanut Butter Rice Krispie Balls

Who doesn’t love a sweet treat that’s easy to make and irresistibly delicious? These Peanut Butter Rice Krispie Balls are the ultimate bite-sized indulgence—packed with the nutty goodness of peanut butter, the satisfying crunch of rice cereal, and a drizzle of rich, melted chocolate. Best of all, there’s no baking required, so you can whip them up in no time. Whether you’re making them for a snack, party, or just to treat yourself, these are sure to be a hit!
Ingredients You’ll Need
1. Rice Krispies Cereal – 2 cups
This gives the treat its signature crunch! You can use any puffed rice cereal, but classic Rice Krispies work best for that light and crispy texture.
2. Peanut Butter – 1 cup
The creamy kind works best here, helping to bind everything together while adding that rich, nutty flavor. If you prefer a chunkier texture, feel free to use crunchy peanut butter!
3. Honey – ½ cup
Honey acts as a natural sweetener and a sticky binder that holds the mixture together. You can swap this for maple syrup if you’d like a vegan option.
4. Vanilla Extract – 1 tsp
A touch of vanilla enhances the flavors and gives the balls a warm, sweet aroma.
5. Dark Chocolate Chips – 1 cup
Melted chocolate adds a luscious finishing touch. Use dark chocolate for a rich flavor, or go for milk chocolate if you like it sweeter.
How to Make Peanut Butter Rice Krispie Balls
Step 1: Prepare the Base
In a large mixing bowl, combine the peanut butter, honey, and vanilla extract. Stir until the mixture is smooth and well combined.
Step 2: Add the Crunch
Slowly fold in the Rice Krispies cereal, making sure every piece is coated in the sticky peanut butter mixture. This part can get a little messy, but it’s worth it!
Step 3: Roll Into Balls
Using your hands or a small cookie scoop, roll the mixture into bite-sized balls. Place them on a baking sheet lined with parchment paper. Tip: Lightly grease your hands to prevent sticking!
Step 4: Melt the Chocolate
In a microwave-safe bowl, heat the chocolate chips in 20-second intervals, stirring between each, until melted and smooth.
Step 5: Drizzle and Chill
Drizzle the melted chocolate over each ball or dip the tops for extra indulgence. Place the tray in the fridge for 20–30 minutes to set.
Step 6: Serve and Enjoy
Once the chocolate has hardened, your Peanut Butter Rice Krispie Balls are ready to devour!
Equipment Needed
Click the links below to grab these must-haves on Amazon to make this recipe a breeze!
- Mixing Bowl – Perfect for combining your ingredients effortlessly.
- Cookie Scoop – Ideal for creating uniform balls without the mess.
- Microwave-Safe Bowl – A must-have for melting chocolate like a pro.
- Parchment Paper – Keeps everything non-stick and easy to clean up.
Frequently Asked Questions
Can I make these ahead of time?
Yes! These store beautifully. Keep them in an airtight container in the fridge for up to a week or freeze them for up to three months.
What can I use instead of peanut butter?
If you’re allergic to peanuts, try almond butter, sunflower seed butter, or any other nut/seed butter you love.
Do I have to use dark chocolate?
Not at all! Milk or white chocolate also work great for this recipe. Just choose your favorite.
Are these gluten-free?
As long as you’re using a certified gluten-free puffed rice cereal, this recipe is completely gluten-free.
How do I prevent the mixture from sticking to my hands?
Lightly grease your hands with a bit of oil or butter before rolling the balls. This trick works like magic!
Can I make this recipe vegan?
Absolutely! Swap the honey for maple syrup and use vegan chocolate chips to make this treat 100% plant-based.
Conclusion
I hope you love these Peanut Butter Rice Krispie Balls as much as I do! They’re quick, easy, and oh-so-satisfying. Perfect for sharing (or not!). Don’t forget to use the share buttons below to spread the love on Facebook, or save this recipe to Pinterest for later. Happy snacking!


